Code
!pip install -q --upgrade transformers diffusers ftfyWe’ll be looking at the DiffEdit paper and implement it with Stable Diffusion.
DiffEdit uses test-conditioned diffusion models to automatically generate semantic maps. This means that instead of generating the mask(semantic maps) manually we can generate them by only providing a text prompt of what we want to edit. Let’s look at an image from the paper to understand what this means.
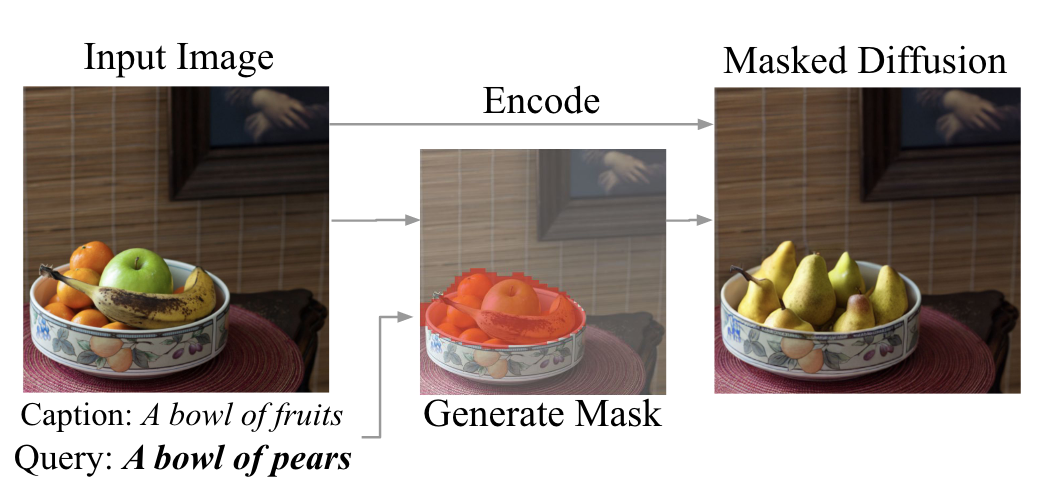
Given the input image and query text - “A bowl of pears” we want to modify the input image to reflect this query while not modifying the rest of the image.
We can see from the output image, “Masked Diffusion”, the bowl, table, background wall are all intact and only the contents of the bowl have changed, reflecting our query - “A bowl of pears”.
So our input image got modified to the output image based on the query while keeping the rest of the image unchanged.
We have another image in the figure above - “Generate Mask”. Prior to this paper users would have to manually draw this mask(the region in red) and then feed it along with the input image to an inpainting algorithm. Now with diffEdit we can automatically generate the mask based on thequery.
We will be using Stable Diffusion as our diffusion model.Hugging Face’s diffusers library makes this easily accesible. You’ll need to accept the license and get a token.
A lot of this notebook is derived from the excellent fastai course taught by Jeremy Howard, Jonathan Whitaker, Tanishq Mathew Abraham, Wasim Lorgat
!pip install -q --upgrade transformers diffusers ftfy# You need your token
from huggingface_hub import notebook_login
notebook_login()import torch
from transformers import CLIPTextModel, CLIPTokenizer
from transformers import logging
from diffusers import AutoencoderKL, UNet2DConditionModel, DDIMScheduler
from tqdm.auto import tqdm
from torch import autocast
import PIL
from PIL import Image
from matplotlib import pyplot as plt
import numpy
from torchvision import transforms as tfms
from fastdownload import FastDownload
import numpy as np
# Supress some unnecessary warnings when loading the CLIPTextModel
logging.set_verbosity_error()
# Set device
torch_device = "cuda" if torch.cuda.is_available() else "cpu"Let’s set up the vae , text_encoder and unet
 vae = AutoencoderKL.from_pretrained("CompVis/stable-diffusion-v1-4", subfolder="vae")

tokenizer = CLIPTokenizer.from_pretrained("openai/clip-vit-large-patch14")
text_encoder = CLIPTextModel.from_pretrained("openai/clip-vit-large-patch14")

unet = UNet2DConditionModel.from_pretrained("CompVis/stable-diffusion-v1-4", subfolder="unet")# Load the autoencoder model which will be used to decode the latents into image space.
vae = AutoencoderKL.from_pretrained("CompVis/stable-diffusion-v1-4", subfolder="vae")
# Load the tokenizer and text encoder to tokenize and encode the text.
tokenizer = CLIPTokenizer.from_pretrained("openai/clip-vit-large-patch14")
text_encoder = CLIPTextModel.from_pretrained("openai/clip-vit-large-patch14")
# The UNet model for generating the latents.
unet = UNet2DConditionModel.from_pretrained("CompVis/stable-diffusion-v1-4", subfolder="unet")
# The noise scheduler
scheduler = DDIMScheduler(beta_start=0.00085, beta_end=0.012, beta_schedule="scaled_linear", clip_sample=False, set_alpha_to_one=False)
# To the GPU we go!
vae = vae.to(torch_device)
text_encoder = text_encoder.to(torch_device)
unet = unet.to(torch_device);def pil_to_latent(input_im):
# Single image -> single latent in a batch (so size 1, 4, 64, 64)
with torch.no_grad():
latent = vae.encode((tfms.ToTensor()(input_im).unsqueeze(0).to(torch_device)*2-1)) # Note scaling
return 0.18215 * latent.latent_dist.sample()
def latents_to_pil(latents):
# batch of latents -> list of images
latents = (1 / 0.18215) * latents
with torch.no_grad():
image = vae.decode(latents).sample
image = (image / 2 + 0.5).clamp(0, 1)
image = image.detach().cpu().permute(0, 2, 3, 1).numpy()
images = (image * 255).round().astype("uint8")
pil_images = [Image.fromarray(image) for image in images]
return pil_images
def image_grid(imgs, rows, cols):
w,h = imgs[0].size
grid = Image.new('RGB', size=(cols*w, rows*h))
for i, img in enumerate(imgs): grid.paste(img, box=(i%cols*w, i//cols*h))
return grid
def pil_to_tensor(input_im):
return tfms.ToTensor()(input_im).unsqueeze(0).to(torch_device)
def tensor_to_pil(image):
image = image.clamp(0, 1)
image = image.detach().cpu().permute(0, 2, 3, 1).numpy()
images = (image * 255).round().astype("uint8")
pil_images = [Image.fromarray(image) for image in images]
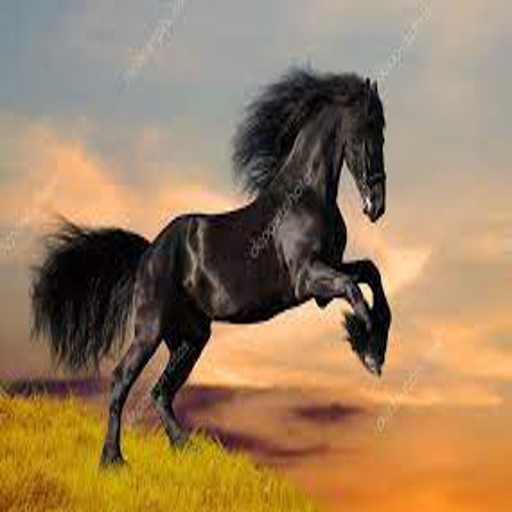
return pil_imagesWe’ll be using this image of a horse, from Depositphotos,Creator: melory melory.
 Given an input image and two different prompts - “Reference Text R”,
 promptR, and “Query Text Q”,promptQ, the text-conditioned diffusion model will generate different noise estimates noiseR and noiseQ respectively. The difference between these noise estimates helps generate the mask. With this mask we can can identify the regions in the image that need to be altered to match the Query Text Q.
Let’s see how we can achieve this:
(section 3.2 SEMANTIC IMAGE EDITING WITH DIFFEDIT in the paper)
1. add Gaussian noise with strength 50%
2. remove extreme values in noise predictions
3. stabilize the effect by averaging spatial differences over a set of n input noises, where n = 10
4. binarize with a threshold of 0.5
Let us follow those general steps and create our generate_noise function.
First let’s tokenize and encode our text to get the embeddings:
text_input = tokenizer(prompt, padding="max_length", max_length=tokenizer.model_max_length, truncation=True, return_tensors="pt")
text_embeddings = text_encoder(text_input.input_ids.to(torch_device))[0]def get_text_embeddings(prompt):
# get prompt text embeddings
text_inputs = tokenizer(prompt, padding="max_length", max_length=tokenizer.model_max_length, return_tensors="pt", truncation=True)
with torch.no_grad():
text_embeddings = text_encoder(text_inputs.input_ids.to(torch_device))[0]
uncond_input = tokenizer([""], padding="max_length", max_length=tokenizer.model_max_length, return_tensors="pt", truncation=True)
with torch.no_grad():
uncond_embeddings = text_encoder(uncond_input.input_ids.to(torch_device))[0]
text_embeddings = torch.cat([uncond_embeddings, text_embeddings])
return text_embeddingsNext we will need to convert our image into latent space using the VAE’s encoder and then add noise to it:
encoded = pil_to_latent(img)
latents = scheduler.add_noise(encoded, noise, timesteps=torch.tensor([scheduler.timesteps[start_step]]))
We pass the text_embeddings and the latents to the unet to predit an estimate of the noise:
noise_pred = unet(latent_model_input, t, encoder_hidden_states=text_embeddings)["sample"]def generate_noise(img,prompt,start_step,seed):
guidance_scale = 8 # Scale for classifier-free guidance
generator = torch.manual_seed(seed)
batch_size = 1
num_inference_steps=50
torch.manual_seed(seed)
# Prep text
text_embeddings = get_text_embeddings(prompt)
# Prep Scheduler (setting the number of inference steps)
scheduler.set_timesteps(num_inference_steps)#add back
#Prep the image
encoded = pil_to_latent(img)
#Add noise
torch.manual_seed(seed)
noise = torch.randn_like(encoded)
t = torch.tensor([scheduler.timesteps[start_step]]).cuda()
latents = scheduler.add_noise(encoded, noise, timesteps=t)
latents = latents.to(torch_device).float()
latent_model_input = torch.cat([latents] * 2)
latent_model_input = scheduler.scale_model_input(latent_model_input, t)
# predict the noise residual
with torch.no_grad():
noise_pred = unet(latent_model_input, t, encoder_hidden_states=text_embeddings)["sample"]
# perform guidance
noise_pred_uncond, noise_pred_text = noise_pred.chunk(2)
noise_pred = noise_pred_uncond + guidance_scale * (noise_pred_text - noise_pred_uncond)
# compute the previous noisy sample x_t -> x_t-1
# latents = scheduler.step(noise_pred, t, latents).prev_sample
latents_x0= scheduler.step(noise_pred, t, latents).pred_original_sample
# return latents_to_pil(latents_x0)[0]
# return latents_to_pil(noise_pred)[0]
return noise_predNote: We are converting these noise predictions to images so we can visualize it.
Let us use our generate_noise function and pass in the image, text prompt and see what we get:
promptR = "a horse in a field"
promptQ = "a zebra in a field"start_step = 25
promptR = "a horse in a field"
promptQ = "a zebra in a field"
noiseR = generate_noise(img, promptR, start_step=start_step, seed=1)
noiseQ = generate_noise(img, promptQ, start_step=start_step, seed=1)
image_grid([latents_to_pil(noiseR)[0],latents_to_pil(noiseQ)[0]],1,2)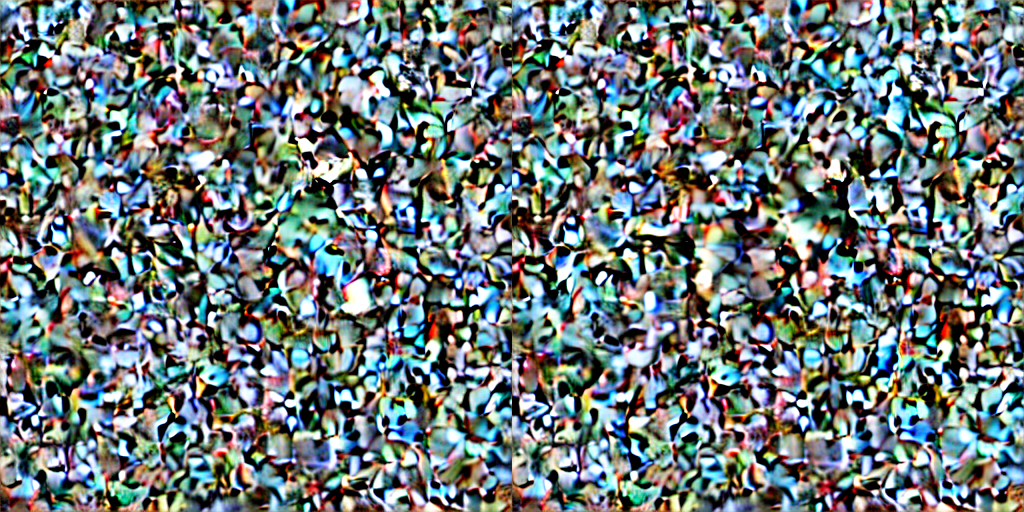
Hmm, that doesn’t look very informative. But remember in Stable Diffusion we iteratively predict how much noise needs to be removed and remove a fraction of it, so that our generated image looks more like the input prompt. So lets take the absolute difference between the noises for each prompt.
def abs_difference(img1,img2):
  img1, img2 = np.array(img1),np.array(img2)
  abs = np.abs(img1*1. - img2*1.)
return Image.fromarray(np.uint8(abs))image_grid([abs_difference(abs_difference(img,latents_to_pil(noiseR)[0]),abs_difference(img,latents_to_pil(noiseQ)[0]))],1,1)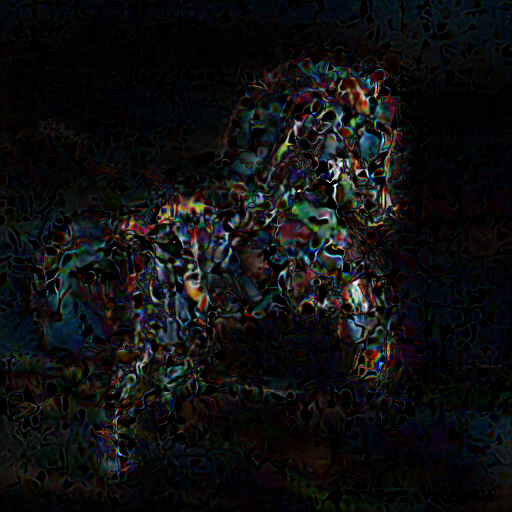
Let us calculate this absolute difference num_avg(n=10 in the paper) times, with different random noise. We could even augment the image for each iteration too.
We scale the image between [0,1]
noiseR = generate_noise(img,promptR,start_step=start_step,seed=n)
noiseQ = generate_noise(img,promptQ,start_step=start_step,seed=n)

abs_diff = torch.abs(noiseR.cpu()-noiseQ.cpu())#absolute difference
abs_diff_scaled = 255*((abs_diff - abs_diff.min())/(abs_diff.max()-abs_diff.min()))#scale

avg_lat = latents_to_pil(stack_of_diff.mean(0)[None].cuda())[0]
avg = np.array(avg_lat)

diff_bin = 255*((avg[:,:,0]>threshold) |(avg[:,:,1]>threshold) |(avg[:,:,2]>threshold))#noise latents
num_avg = 10
stack_of_diff = torch.zeros((num_avg,4,size//8,size//8))
for n in tqdm(range(num_avg)):
noiseR = generate_noise(img,promptR,start_step=start_step,seed=n)
noiseQ = generate_noise(img,promptQ,start_step=start_step,seed=n)
abs_diff = torch.abs(noiseR.cpu()-noiseQ.cpu())#absolute difference
abs_diff_scaled = 255*((abs_diff - abs_diff.min())/(abs_diff.max()-abs_diff.min()))#scale
stack_of_diff[n] = abs_diff_scaled
#noise latents averaaged
avg_lat = latents_to_pil(stack_of_diff.mean(0)[None].cuda())[0]
avg = np.array(avg_lat)
threshold = 210
diff_bin = 255*((avg[:,:,0]>threshold) |(avg[:,:,1]>threshold) |(avg[:,:,2]>threshold))
diff_bin = np.dstack((diff_bin,diff_bin,diff_bin))
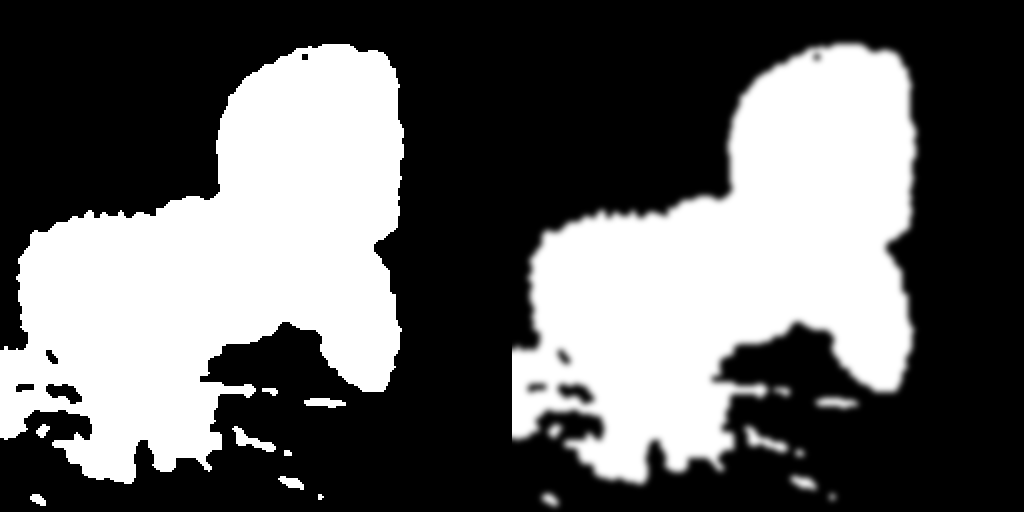
plt.imshow(np.uint8(diff_bin),cmap="gray");Next we’ll binarize it with a threshold and do a few more operations like median filter, dilation, erosion etc to enhance the mask.
pil_im = Image.fromarray(np.uint8(diff_bin))
pil_im_ds = pil_im.resize((256,256),PIL.Image.NEAREST,)

pil_im_ds = pil_im_ds.filter(PIL.ImageFilter.MedianFilter(size = 3))
# pil_im_ds = pil_im_ds.filter(PIL.ImageFilter.MedianFilter(size = 3))

pil_im_ds = pil_im_ds.filter(PIL.ImageFilter.MaxFilter(3))
# pil_im_ds = pil_im_ds.filter(PIL.ImageFilter.MinFilter(3))
# pil_im_ds = pil_im_ds.filter(PIL.ImageFilter.MaxFilter(3))
# pil_im_ds = pil_im_ds.filter(PIL.ImageFilter.MaxFilter(3))
pil_im_ds = pil_im_ds.filter(PIL.ImageFilter.MinFilter(3))


mask = pil_im_ds.resize((512,512),PIL.Image.NEAREST,)
image_grid([img,mask],1,2)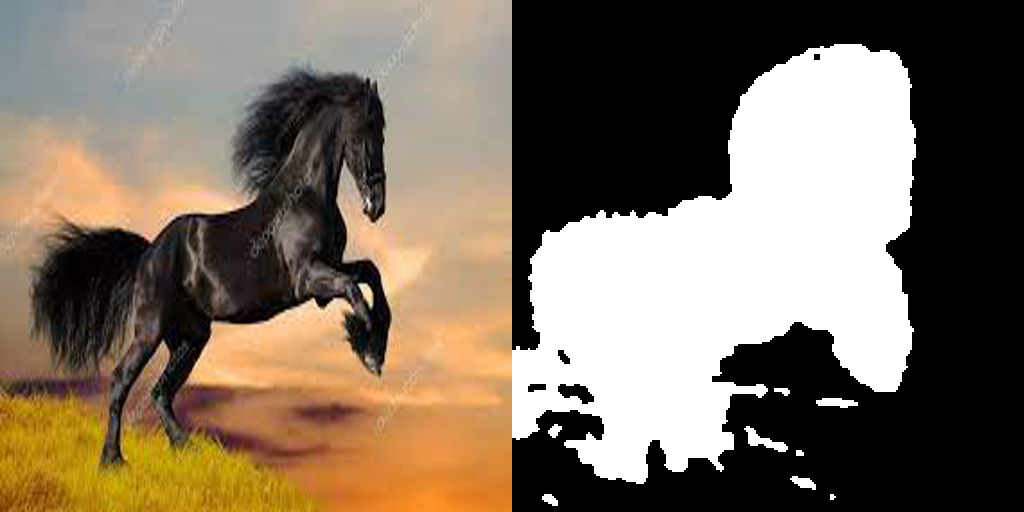
Feathering
The mask has very sharp transitions at the edges, we can mitigate this by applying a gaussian filter.
So we started with an encoded version of the image and added noise to it. We predict how much noise needs to be removed from this encoded version to match the prompts, promptR and promptQ which gave us noiseR and noiseQ. The difference between noiseR and noiseQ gave us the mask.
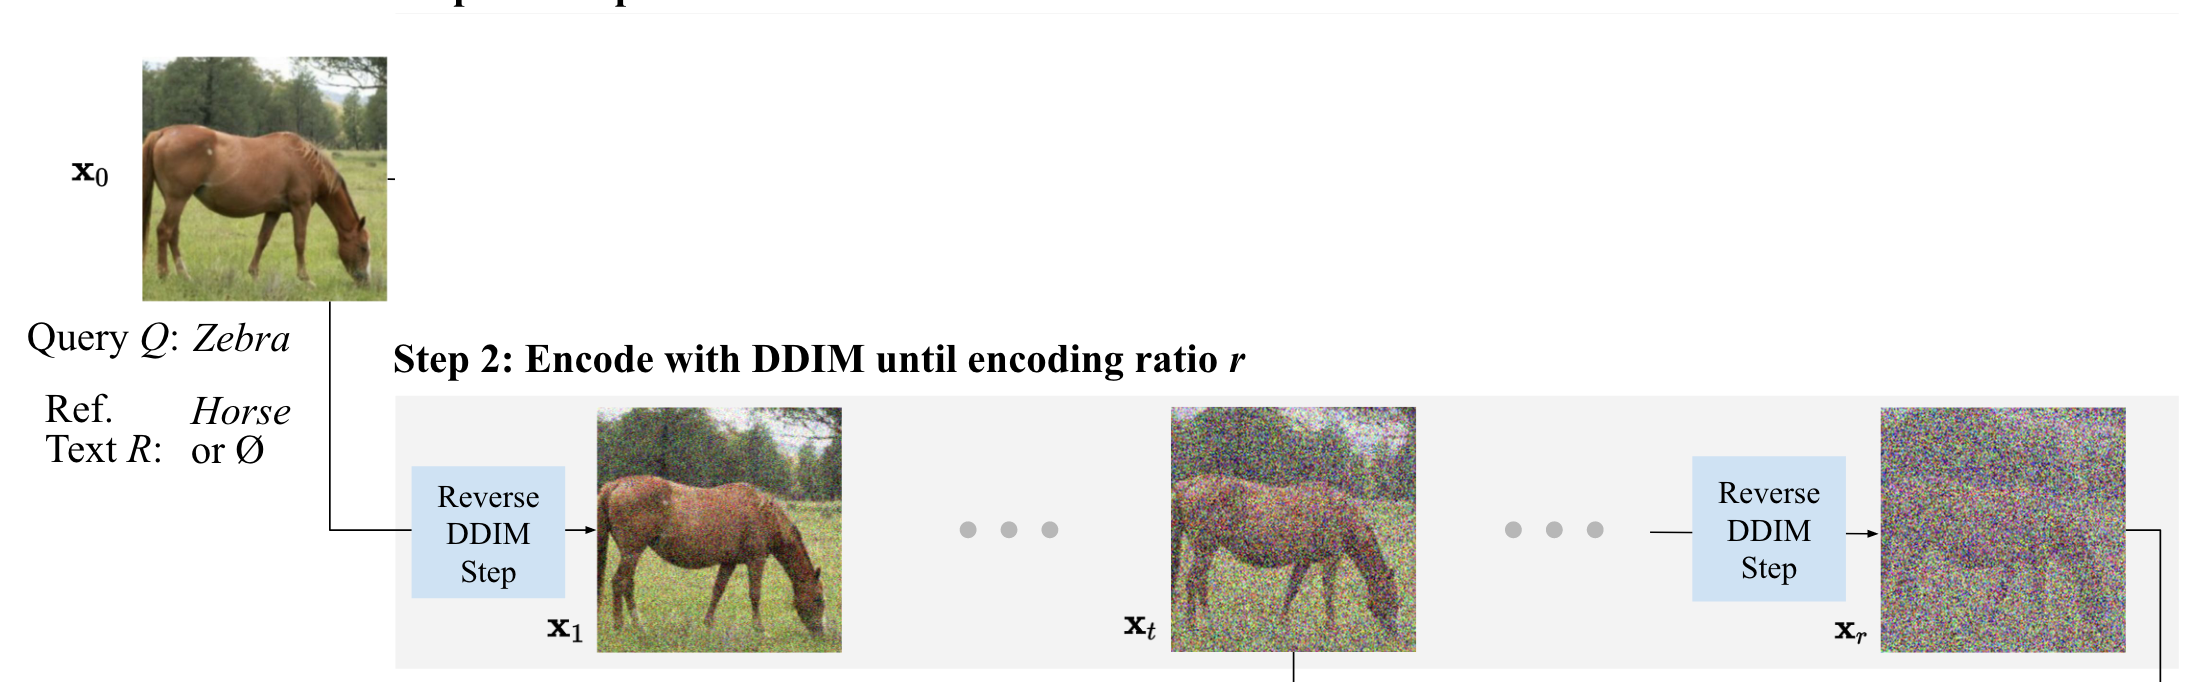 All we do here is add noise to the input image iteratively, this is called the reverse diffusion process. This is done with the unconditional model, that means we don’t use any prompt for this step.
We encode our image and add noise to it, very similar to Step 1. There are two differnces from Step 1 though:
timestep but here we progressively add it a bunch of timesencoded = pil_to_latent(img)
latents = scheduler.add_noise(encoded, noise, timesteps=torch.tensor([reversed(scheduler.timesteps)[i]]))start_step=25
encoded = pil_to_latent(img)
step2_latents=[]
noised_img=[]#progressively noisy images for display
num_inference_steps = 50 # Number of denoising steps
scheduler.set_timesteps(num_inference_steps)
latents = encoded
latents = latents.to(torch_device).float()
step2_latents.append(latents)
noise = torch.randn_like(encoded)
rev_sched_timesteps = reversed(scheduler.timesteps)
# Loop - look at scheduler.sigmas, scheduler.sigmas[0] has max noise and scheduler.sigmas[-1] has least noise, so we need to reverse
for i, t in tqdm(enumerate(rev_sched_timesteps)):
if i < start_step-1:#Encoding ratio, xr
#print(i,t.item(),rev_sched_timesteps[i],reversed(scheduler.timesteps)[i])
latents = scheduler.add_noise(encoded, noise, timesteps=torch.tensor([rev_sched_timesteps[i]]))
latents = latents.to(torch_device).float()
step2_latents.append(latents)
noised_img.append(latents_to_pil(latents)[0])
image_grid(noised_img[0:start_step:2],1,5) 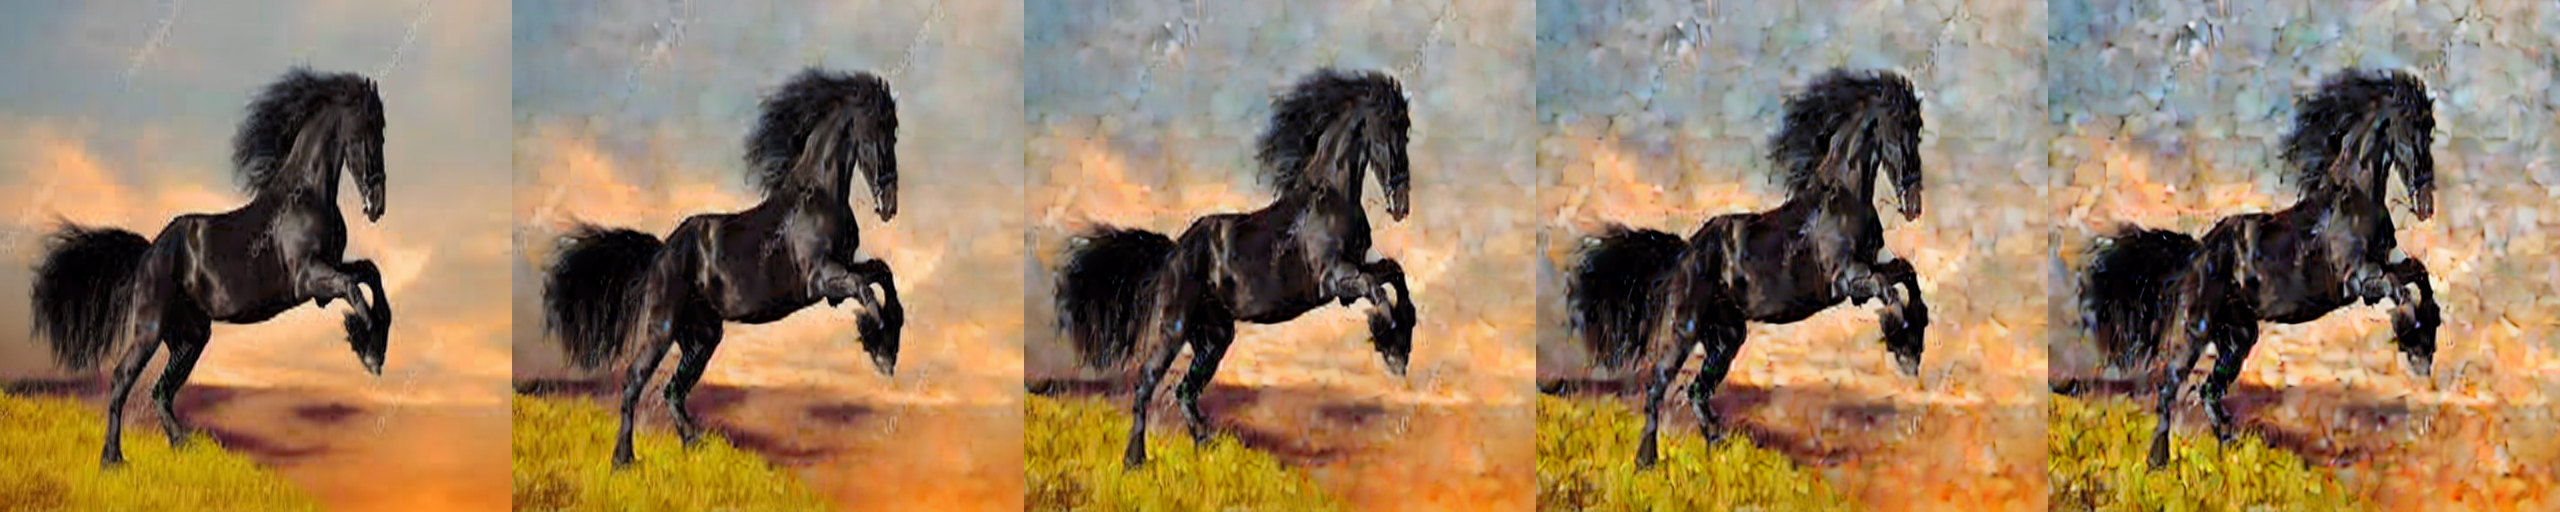
We only noise the images upto a certain timestep, that corresponds to xr. This is the starting latent for the decoding in Step 3, \(y_r = x_r\). We don’t want to end up starting from complete noise. How many timesteps we choose effects the final image. Larger the timestep the edit will match the text query more strongly which allows for more modifications of the background.
Note: scheduler.sigmas starts with the highest sigma for noise and gradually reduces to zero, we are seeing the reverse in the images above. This is because during the forward diffusison process we start from a completely noisy image, highest sigma and gradually reduce the noise to zero to get the output image.
Encoding is also called reverse diffusion and decoding is called forward diffusion process.
Here we look at the masks generated for the. following encoding_ratios - [10,15,20,25,30,35,40,45]

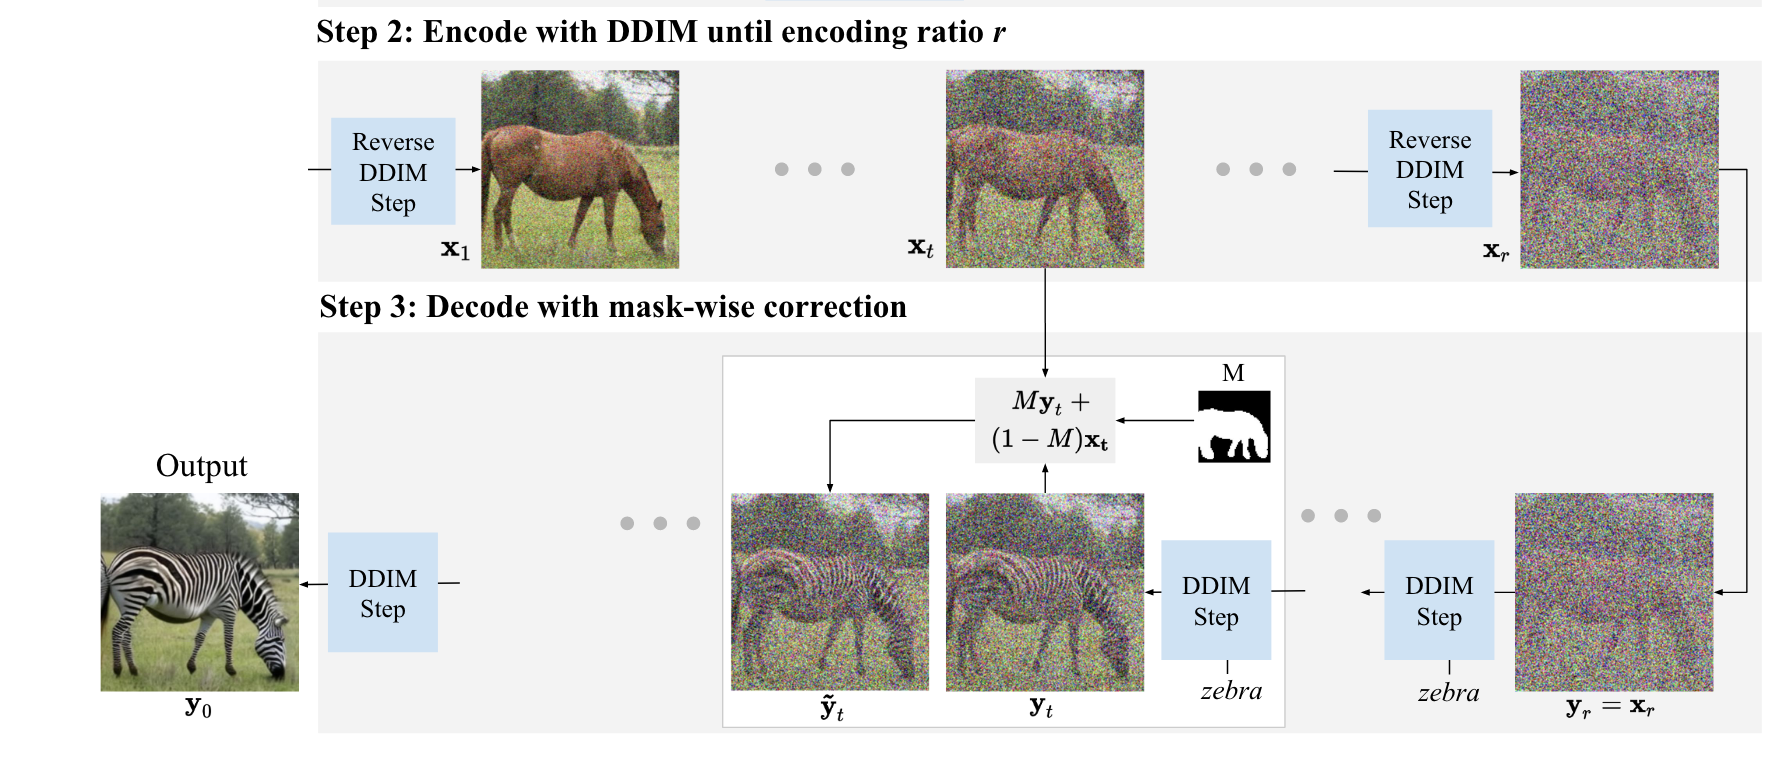 So we have generated the mask, we have the latents of the gradually noised images from Step 2,[
x1, … xt, … xr]
We use our diffusion model to decode the step 2 latents it with our text query Q, e.g. zebra. We use the mask M to guide this diffusion process by replacing pixels outside the mask with the latents xt, this would keep these parts of the image similar to the input. Whereas within the mask, M, the diffusion model is guided with the text querry.
This update can be written as: \[\hat{y}_t = My_t + (1 − M )x_t\]
We tokenize and encode our promptQ(“a zebra on the field”) to get our embeddings:
text_input = tokenizer(promptQ, padding="max_length", max_length=tokenizer.model_max_length, truncation=True, return_tensors="pt")
text_embeddings = text_encoder(text_input.input_ids.to(torch_device))[0]
Copy over our latents from Step 2 at timestep r, \(y_r = x_r\)
latents = step2_latents[encoding_r_step]And we start our diffusion loop to predict noise and gradually remove it.
noise_pred = unet(latent_model_input, t, encoder_hidden_states=text_embeddings)["sample"]
latents = scheduler.step(noise_pred, t, latents).prev_sample
Then before we start the next iteration of diffusion we need to update our latents based on the mask.
latents = mask_ten[0,0,:,:] * latents + (1.0 - mask_ten[0,0,:,:]) * step2_latents[encoding_r_step]diffusion_img_list=[]
num_inference_steps = 50 # Number of denoising steps
guidance_scale = 5 # Scale for classifier-free guidance
batch_size = 1
# Prep text (same as before)
text_embeddings = get_text_embeddings(promptQ)
# Prep Scheduler (setting the number of inference steps)
scheduler.set_timesteps(num_inference_steps)
encoding_r_step = start_step-1#30-1
# print(f"encoding_r_step: {encoding_r_step}")
latents = step2_latents[encoding_r_step]#noised latent, xr from step 2
latents = latents.to(torch_device).float()
mask_ten = pil_to_tensor(mask.resize((64,64),PIL.Image.NEAREST,))
# Loop
for i, t in tqdm(enumerate(scheduler.timesteps)):
if i > num_inference_steps - start_step:
# print(f'for denoising: {i}, {encoding_r_step}')
latent_model_input = torch.cat([latents] * 2)
latent_model_input = scheduler.scale_model_input(latent_model_input, t)#??scale
# predict the noise residual
with torch.no_grad():
noise_pred = unet(latent_model_input, t, encoder_hidden_states=text_embeddings)["sample"]
# perform guidance
noise_pred_uncond, noise_pred_text = noise_pred.chunk(2)
noise_pred = noise_pred_uncond + guidance_scale * (noise_pred_text - noise_pred_uncond)
# compute the previous noisy sample x_t -> x_t-1
latents = scheduler.step(noise_pred, t, latents).prev_sample
encoding_r_step = encoding_r_step - 1
latents = mask_ten[0,0,:,:] * latents + (1.0 - mask_ten[0,0,:,:]) * step2_latents[encoding_r_step]
updated_img = latents_to_pil(latents)[0]
diffusion_img_list.append(updated_img)
On the left we see the original horse image and we were able to reasonably convert it to a zebra without drawing the mask manually.
The paper points out another drawback of inpainting - “(i) inpainting discards information about the input image that should be used in image editing (e.g. changing a dog into a cat should not modify the animal’s color and pose)” let’s see if we can compare them and see what are the effects of this.
The main contribution of the diffEdit paper is the automatic mask generation. Once this mask is generated we could use it for the inpainting algorithm. Let’s see what the difference in the results are and try to understand what is happening.
from diffusers import StableDiffusionInpaintPipeline
from PIL import ImageDraw

pipe_inpaint = StableDiffusionInpaintPipeline.from_pretrained(
    "CompVis/stable-diffusion-v1-4",
    revision="fp16",
    torch_dtype=torch.float16,
).to("cuda")msk = mask.resize((512,512),PIL.Image.NEAREST,)
torch.manual_seed(100)
from torch import autocast
with autocast("cuda"):
images = pipe_inpaint(prompt="a zebra on the beach ", init_image=img, mask_image=msk,strength=0.8,guidance_scale=7.5, num_inference_steps=50).images
image_grid([img,images[0]],1,2)
The stripes in the inpainting case looks much better.
Why is this?
With the diffEdit algorithm we are uaing the mask and mixing in the latent space so we see the zebra still retains the black color of the horse (the input latents from Step 2 are being mixed in).
In the latent space the the parts that are masked are not lost completely since the neighboring pixels in the latent space have information about it (due to compression).
In the painting case we do not mix the latents. The part that is masked out is never seen by the model, it is discarded. Hence it generates cleaner white and black stripes.
So is inpainting better than diffEdit?
Well in this case the inpainting seems to produce the cleaner black and white stripes.
But as the paper points out “(i) inpainting discards information about the input image that should be used in image editing (e.g. changing a dog into a cat should not modify the animal’s color and pose)” so instances when we want color and pose to be retained diffEdit should perform much better than inpainting.
Start with a smaller input image size instead of 512x512, since we are generating a rough mask, we can process it much faster.
While genrating the mask over n iterations with different noise, we can use augmentaion(change the brightness, sharpness etc)
For Step 1, go through the whole diffusion process and accumulate the noise and use that for mask generation.
This notebook derives heavily from the Stable Diffusion Deep Dive Notebook from Jonathan Whitaker